这个教程将Vue项目从 vendors的5MB 优化到 几百KB, 包含对模块细拆分
首先解决这个问题有几种方式:
- CDN 全局注入依赖
- 自定义分块
CDN注入依赖的方式, 需要取决于CDN的响应速度, 若CDN响应较慢, 自己的页面打开速度就会受到影响, 若自身服务器不存在速度上的瓶颈, 还是推荐使用 自定义分块, 因为稳定性和快速渲染是最重要的
环境
预览环境
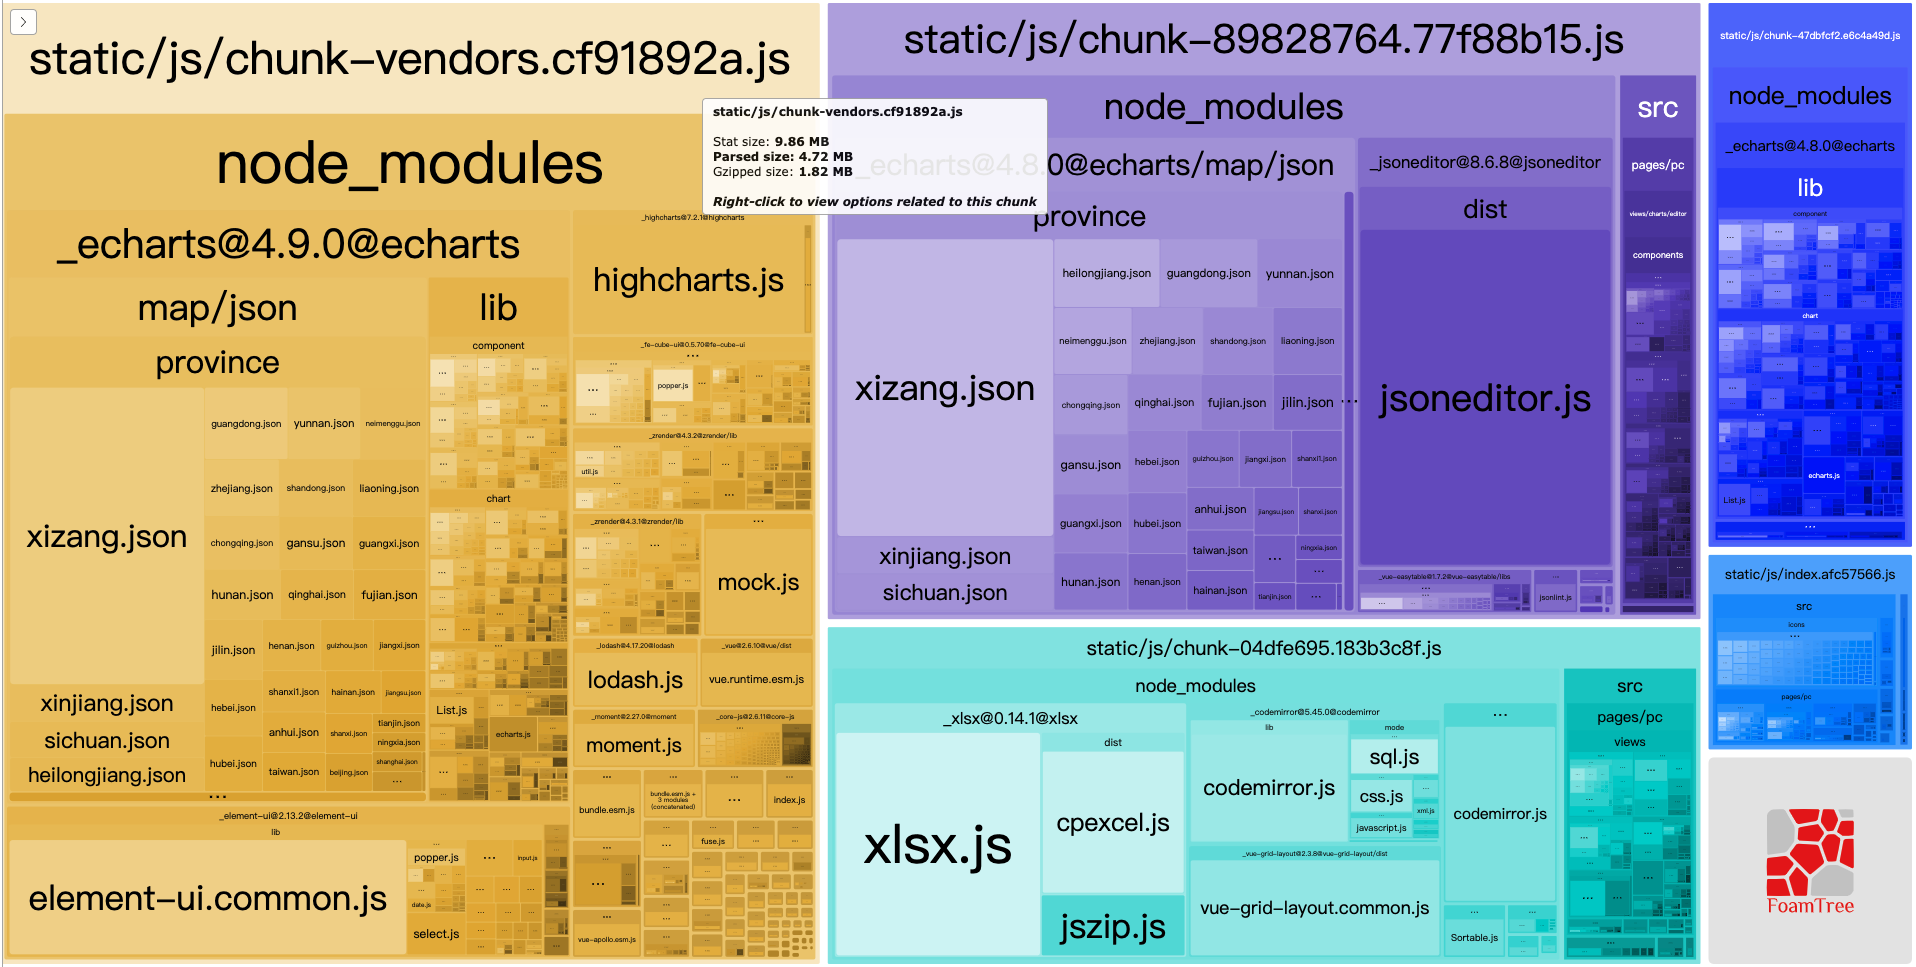
大概长这样, 可以明确看到每个 模块 的大小, 以及各个 模块 下的 子模块 分布情况, 自行百度了解
浏览器环境
为了对网站加载情况验证, 打包后是否能正常使用等, 需要获取加载资源的过程分析工具, 以 Chrome 为例
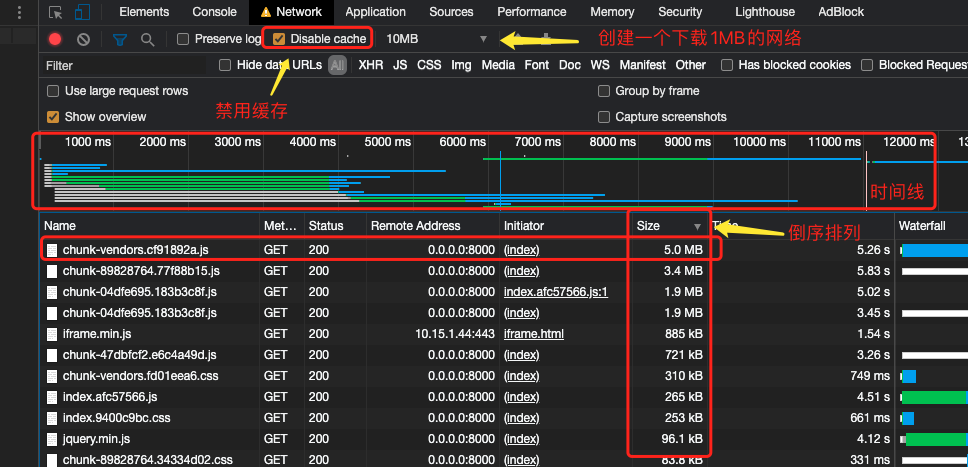
- 打开chrome 的 network 工具
- 禁用缓存, (如果对加载性能要求高, 可以创建一个符合情况的网络)
- 分析耗时
分析
日志
打包完成后的输出, 可以直观的看到直接依赖的每个包的大小情况等等, 不包含子模块的分布
dist/static/js/chunk-vendors.cf91892a.js     4835.36 KiB      1864.70 KiB
dist/static/js/chunk-89828764.77f88b15.js    3313.86 KiB      1263.45 KiB
dist/static/js/chunk-04dfe695.183b3c8f.js    1830.89 KiB      598.43 KiB
预览
- 使用浏览器打开
report.html文件, 例如: <项目>/dist/report.html文件 - 执行下面的命令, 然后浏览器打开 http://0.0.0.0:8000/report.html
1
2
 # 机器需要装有 python3, 记住这条命令, 能在目录切换和命令行上节省不少时间, 进行快速调试
 cd <项目路径> && npm run build && cd dist && python -m http.server
打包
根据日志或者预览环境的信息, 可以看到 vendors 居然占用到了4.72MB 的大小, 同时包含 element-ui, echarts, lodash 等多个子包在内.
拆一个包
万事开头难, 先拿 element-ui 开刀试试效果, 修改配置:
1
2
3
4
5
6
7
8
9
10
11
12
13
14
15
16
17
18
19
20
21
22
// vue.config.js
module.exports = {
    // ...
    chainWebpack(config) {
        // 生成环境开启
        if (process.env.NODE_ENV !== 'development') {
            // 抽包
            config.optimization.splitChunks({
                cacheGroups: {
                    // 第三方块抽离 ****************************************************************
                    "chunk-element-ui": {
                        name: "chunk-element-ui",
                        test: /[\\/]node_modules[\\/]element-ui/, // 匹配所有element-ui相关的包
                        chunks: "all",
                        reuseExistingChunk: true,
                        enforce: true
                    },
                }
            })
        }
    }
}
打包:
1
cd <项目路径> && npm run build && cd dist && python -m http.server
打开页面看看加载是否存在问题 http://0.0.0.0:8000
依赖警告

控制台有几个警告信息, 正好是刚刚修改的 element-ui 的拆包 并且服务已经白屏无法正常打开, 错误信息如下:
The resource XXX was preloaded using link preload but not used within a few seconds from the window's load event. Please make sure it has an appropriate as value and it is preloaded intentionally.
这个问题是 更改过入口或使用 多入口开发(多页应用)或未使用默认配置导致的, 需要 显式声明块和页面的依赖关系 , 修改自定义的抽块依赖配置:
1
2
3
4
5
6
7
8
9
10
11
12
13
14
15
16
17
18
19
20
21
22
23
24
25
26
27
28
29
// vue.config.js
module.exports = {
    pages: {
        index: {
            chunks: [
                'index', //  这是基本页面块, 不能少
                'chunk-element-ui',  // 这里是自定义拆分的块名称, 要对应 optimization.splitChunks 下的name填写
            ],
        },
    },
    chainWebpack(config) {
        // 生成环境开启
        if (process.env.NODE_ENV !== 'development') {
            // 抽包
            config.optimization.splitChunks({
                cacheGroups: {
                    // 第三方块抽离 ****************************************************************
                    "chunk-element-ui": {
                        name: "chunk-element-ui",
                        test: /[\\/]node_modules[\\/]element-ui/, // 匹配所有element-ui相关的包
                        chunks: "all",
                        reuseExistingChunk: true,
                        enforce: true
                    },
                }
            })
        }
    }
}
注意:
pages.[PAGE].chunks字段与optimization.splitChunks.cacheGroups内的name字段需要 一一对应
再次打包, 并开启浏览器检查时候还有白屏警告的情况
拆分成功
通过浏览器打开页面检查一切正常
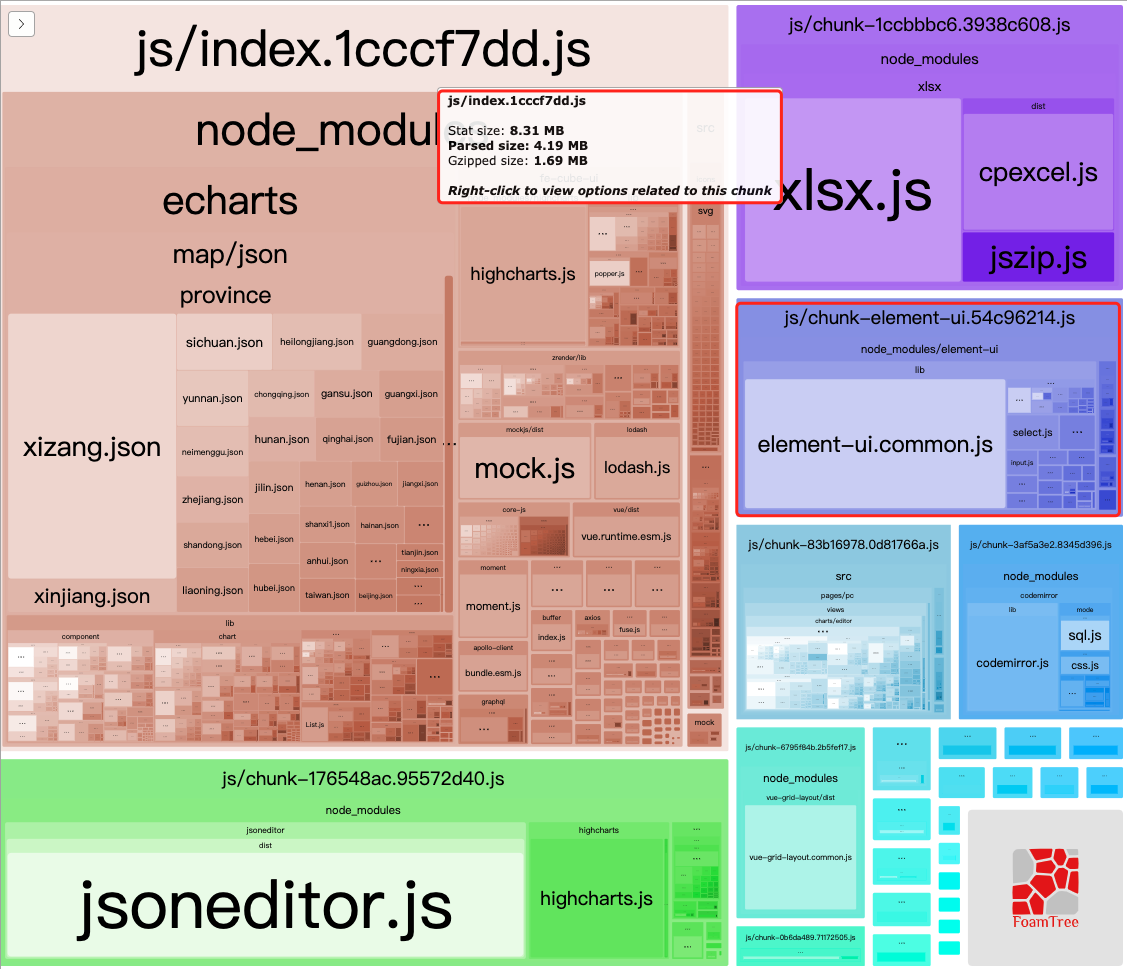
此时通过预览页可以看到 element-ui 被单独拆到了一个包内, 但是 vendors 这个包不见了(先忽略这个问题), 打开浏览器页面还是正常的.
打开预览后入口文件由 4.72MB 到 4.19MB 效果立竿见影
加载瓶颈
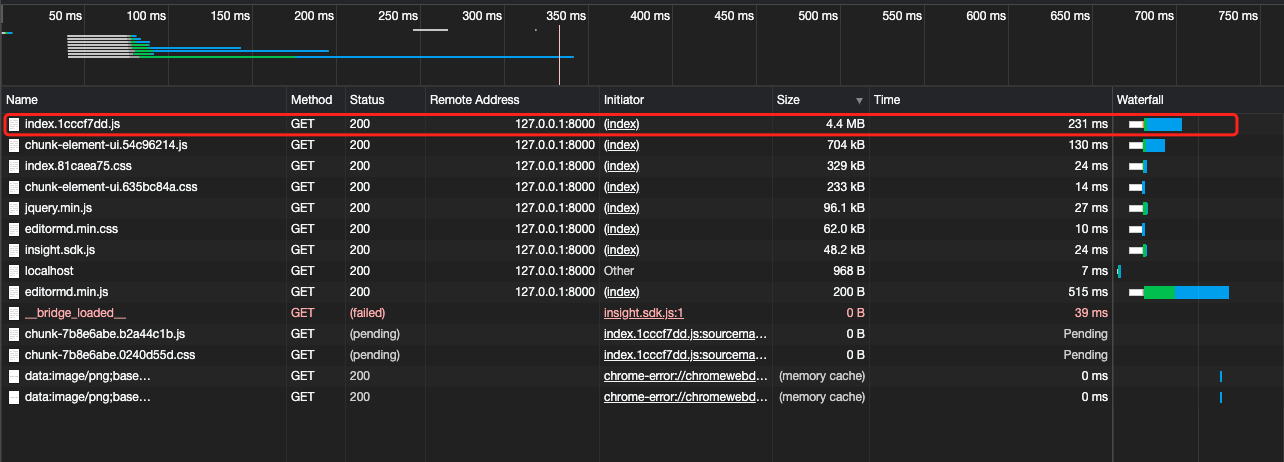
从网络时间线可以看到浏览器在加载资源的顺序和耗时, 当 html文件 加载完成后, 所有的 chunk 都是同时并发加载的, 这时候就会有木桶效应, 整个页面会等待最大的块的响应, 这里的 index.js 的块依然过大, 继续拆分
逻辑复用
根据上面的配置, 可以看到每个块的 name 都是要写入到 pages.[PAGE].chunks 中, 为了方便后续维护, 写个逻辑兼容一下, 很简单代码如下
1
2
3
4
5
6
7
8
9
10
11
12
13
14
15
16
17
18
19
20
21
22
23
24
25
26
27
28
29
// 分块逻辑
const SPLIT_CHUNKS = {
    'chunk-element-ui': { 'test': /[\\/]node_modules[\\/]element-ui/ },
}
// 增加附加配置
Object.keys(SPLIT_CHUNKS).forEach((name, priority) => Object.assign(SPLIT_CHUNKS[name], {
    name,
    priority, // 优先级, 根据下标决定
    enforce: true,
    reuseExistingChunk: true,
    chunks: SPLIT_CHUNKS[name].chunks || 'all', // 默认 all
}))
// 配置
module.exports = {
    pages: {
        index: {
            chunks: ['index', ...Object.keys(SPLIT_CHUNKS)], // 声明块到index页面
        },
    },
    chainWebpack(config) {
        // 生成环境开启
        if (process.env.NODE_ENV !== 'development') {
            // 抽包
            config.optimization.splitChunks({
                cacheGroups: { ...SPLIT_CHUNKS } // 插入分块配置
            })
        }
    }
}
全部抽离
回到 index.js 这个块依然很大的问题, 需要将其他较大 模块 依照优先级都拆分出来, 我的个人配置如下:
1
2
3
4
5
6
7
8
9
10
11
12
13
14
const SPLIT_CHUNKS = {
    'chunk-element-ui': { 'test': /[\\/]node_modules[\\/]element-ui/ },
    'chunk-vue': { 'test': /[\\/]node_modules[\\/]vue/ },
    'chunk-zrender': { 'test': /[\\/]node_modules[\\/]zrender/ },
    'chunk-mockjs': { 'test': /[\\/]node_modules[\\/]mockjs/ },
    'chunk-lodash': { 'test': /[\\/]node_modules[\\/]lodash/ },
    'chunk-vue-grid-layout': { 'test': /[\\/]node_modules[\\/]vue-grid-layout/ },
    'chunk-codemirror': { 'test': /[\\/]node_modules[\\/]codemirror/ },
    'chunk-highcharts': { 'test': /[\\/]node_modules[\\/]highcharts/ },
    'chunk-jsoneditor': { 'test': /[\\/]node_modules[\\/]jsoneditor/ },
    'chunk-jspdf': { 'test': /[\\/]node_modules[\\/]jspdf/ },
    'chunk-xlsx': { 'test': /[\\/]node_modules[\\/]xlsx/ },
    'chunk-echarts': { 'test': /[\\/]node_modules[\\/]echarts/ },
}
打包:
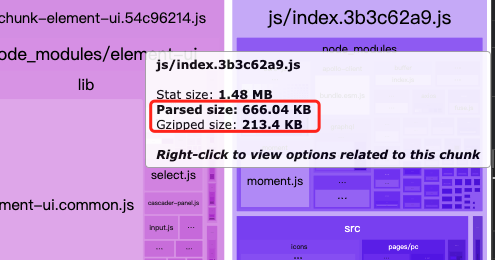
这次的基本拆分的非常细了, index.js 块的大小已经从 4.72MB 缩减到了 660.04KB, 质的提升, 同时我们看一下加载
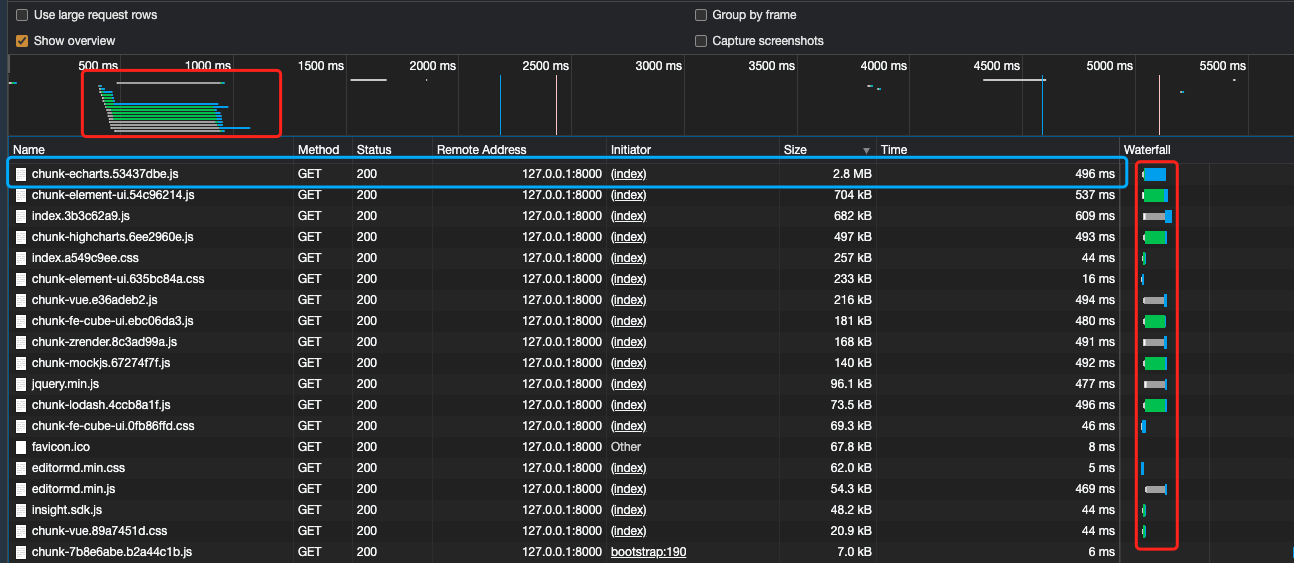
虽然看上去访问的时间不太长, 时间线基本上都是很快响应, 主要是因为访问的是本地的网络和文件, 但是 echarts 模块依然是明显的过大, 依然拉长了响应处理的时间, 想要解决这个问题的办法就是继续拆包.
子包拆分
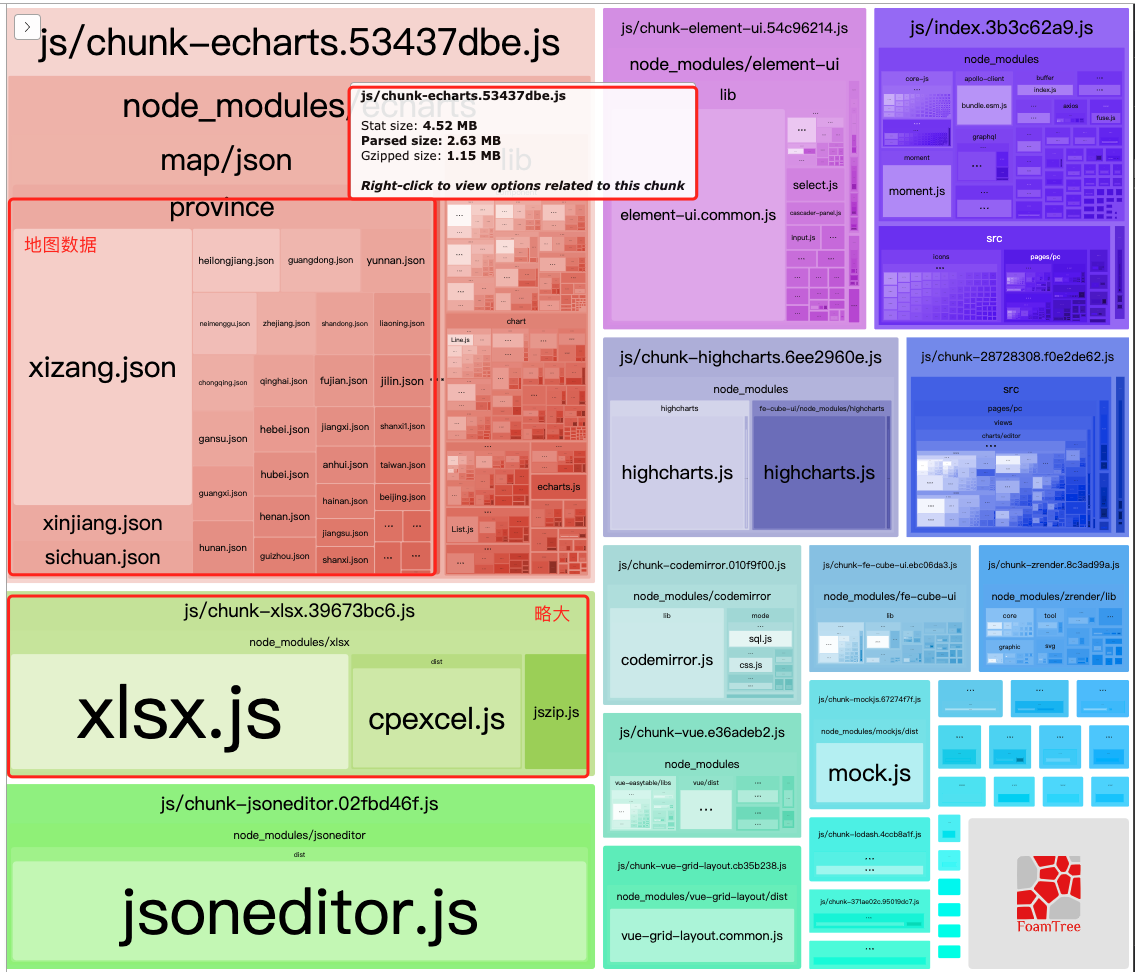
打开预览页发现 echarts 的 地图JSON数据 依然占据了太多的空间, 以及xlsx也能继续优化, 那我们先针对 echarts 进行再切割
修改配置:
1
2
3
4
5
6
7
8
9
10
11
12
13
14
15
16
17
18
19
20
21
22
23
const SPLIT_CHUNKS = {
    'chunk-element-ui': { 'test': /[\\/]node_modules[\\/]element-ui/ },
    'chunk-vue': { 'test': /[\\/]node_modules[\\/]vue/ },
    'chunk-zrender': { 'test': /[\\/]node_modules[\\/]zrender/ },
    'chunk-mockjs': { 'test': /[\\/]node_modules[\\/]mockjs/ },
    'chunk-lodash': { 'test': /[\\/]node_modules[\\/]lodash/ },
    'chunk-vue-grid-layout': { 'test': /[\\/]node_modules[\\/]vue-grid-layout/ },
    'chunk-codemirror': { 'test': /[\\/]node_modules[\\/]codemirror/ },
    'chunk-highcharts': { 'test': /[\\/]node_modules[\\/]highcharts/ },
    'chunk-jsoneditor': { 'test': /[\\/]node_modules[\\/]jsoneditor/ },
    'chunk-jspdf': { 'test': /[\\/]node_modules[\\/]jspdf/ },
    'chunk-xlsx': { 'test': /[\\/]node_modules[\\/]xlsx/ },
    'chunk-echarts': { 'test': /[\\/]node_modules[\\/]echarts/ },
    // 地图单独拆分
    'chunk-echarts-map': { 'test': /[\\/]node_modules[\\/]echarts[\\/]map[\\/]json[\\/]province/ },
}
Object.keys(SPLIT_CHUNKS).forEach((name, priority) => Object.assign(SPLIT_CHUNKS[name], {
    name,
    priority, // 这里 ********************************************************
    enforce: true,
    reuseExistingChunk: true,
    chunks: SPLIT_CHUNKS[name].chunks || 'all',
}))
这里的配置需要注意
priority(优先级), 若一个[CHUNK].test有多个能命中的, 优先级高的会优先执行
代码中 priority 是根据下标大小决定优先级的, 所以 chunk-echarts-map 要高于 chunk-echarts 在优先级, 这样才能正确分包, 所以使用这段代码配置一定要注意配置顺序.
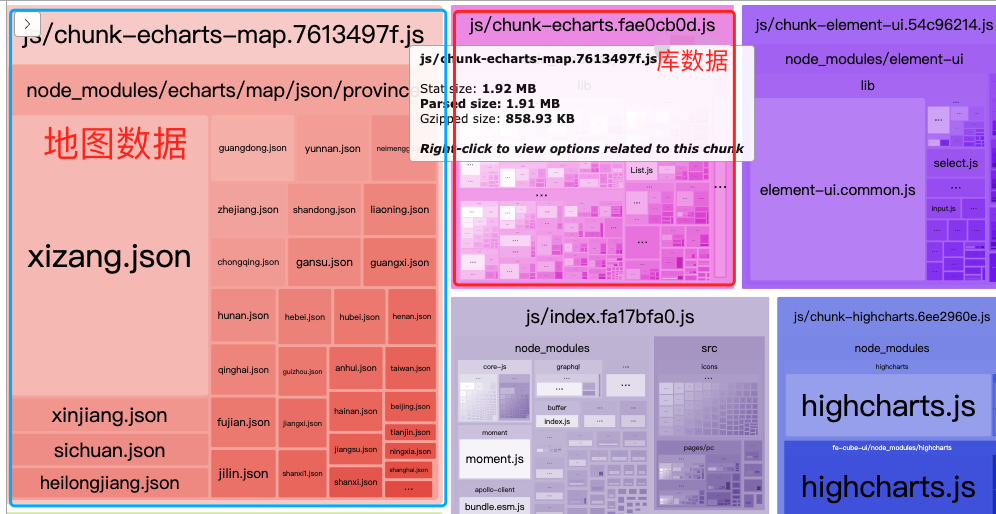
这样就完成了包的分离, 块变得更小
这里说一下为什么会有优先级, 当 reuseExistingChunk 设置为 true 的时候, 如果这个包已经打过, 其他规则就会忽略这个已经打过的包, 转为依赖他, 而 优先级 决定了规则匹配的顺序.
vendors
如何找回 vendors 呢? 其实这个是 webpack 保留的分组, 拷贝一份默认配置到 config.optimization.splitChunks 即可
1
2
3
4
5
6
7
8
9
10
11
12
13
14
15
16
const DEFAULT_CHUNKS = {
    common: {
        name: "chunk-common",
        chunks: "initial",
    },
    vendors: {
        name: "chunk-vendors",
        test: /[\\/]node_modules[\\/]/,
        chunks: "initial",
        // minChunks: Infinity, // 无穷的小块
    }
}
// ...
config.optimization.splitChunks({
    cacheGroups: {  ...DEFAULT_CHUNKS, ...SPLIT_CHUNKS } // 插入分块配置
})
默认的分块
优先级不设置的话是负数,
完成
至此完成了包的分块切割, 要根据自身的业务进行合理的拆分才能让页面加载速度更快.
提升
压缩
开启压缩可以进一步加快请求速度, 使用 compression-webpack-plugin 插件
安装到调试包列表
1
2
3
npm install compression-webpack-plugin --save-dev
// or
yarn add compression-webpack-plugin --dev
增加压缩插件
1
2
3
4
5
6
7
8
9
10
11
12
13
14
15
const CompressionWebpackPlugin = require('compression-webpack-plugin')

module.exports = {
    configureWebpack: {
        plugins: [
            new CompressionWebpackPlugin({
                algorithm: 'gzip',
                test: new RegExp('\\.(' + ['js', 'css', 'html', 'json'].join('|') + ')$'),
                threshold: 10240,
                minRatio: 0.8,
                // deleteOriginalAssets: true
            }),
        ]
    },
}
修改nginx配置支持gzip传输
1
2
3
4
5
6
7
8
9
10
11
server {
    # ...

    gzip on;
    gzip_min_length 1k;
    gzip_comp_level 9;
    gzip_types text/plain application/javascript application/x-javascript text/css application/xml text/javascript application/x-httpd-php image/jpeg image/gif image/png;
    gzip_vary on;
    gzip_disable "MSIE [1-6]\.";

}
简单配置
1
2
3
4
5
6
7
8
9
10
11
12
13
14
15
16
17
18
19
20
21
22
23
24
25
26
27
28
29
30

module.exports = {
    pages: {
        index: {
            chunks: [
                'index', // >>> 这是基本页面块, 不能丢掉
                'chunk-element-ui',  // 这里是刚刚的块的名称, 要对应填写
            ],
        },
    },
    chainWebpack(config) {
        // 生成环境开启
        if (process.env.NODE_ENV !== 'development') {
            // 抽包
            config.optimization.splitChunks({
                cacheGroups: {
                    // 第三方块抽离 ****************************************************************
                    "chunk-element-ui": {
                        name: "chunk-element-ui",
                        test: /[\\/]node_modules[\\/]element-ui/, // 匹配所有element-ui相关的包
                        chunks: "all",
                        reuseExistingChunk: true,
                        enforce: true
                    },
                }
            })
        }
    }
}
参数说明
pages.[PAGE].chunks: 手动分块后需要说明页面的引用块有哪些optimization.splitChunks.cacheGroups.[CHUNK]name: 块的名称. 用于在 pages.[PAGE].chunks 内声名块的使用test: 块的匹配规则. 包含三种类型的匹配方式function: 方法匹配. 返回一个布尔值用于确认是不是要分到当前的块内, 格式: function (module, chunk) => booleanRegExp: 正则匹配.String: 直接字符匹配(完全匹配).
chunks: 包含的块的类型. 可以使all|async|initial, 这里不多做解释自行了解即可, 个人推荐只使用 allreuseExistingChunk: 是否重用现有的块. 若不重用可能会导致多页场景或多个位置导入包的时候, 打出多个类似的包来, 这样会较浪费客户机流量重复下载相同的包.enforce: 是否强制执行. 必须开启, 如果不开启强制执行, 在某些情况下你的 cacheGroups[CHUNK] 打包配置并不能生效, 你会发现明明写了配置, 包还是没切出来priority: 优先级, 数字越大优先级越高. 这个比较重要, 如果你需要对单个包抽离成多个子包, 例如 echarts 抽离成 echart-map 和 echart-component 等等, 优先级是需要最先考虑的配置
[CHUNK].test
对于 [CHUNK].test 的正则可以通过拷贝包路径后在控制台反复练习, 正则也是开发不可缺少的必要技能, 建议勤加练习.
1
2
/[\\/]node_modules[\\/]element-ui/.test('/node_modules/element-ui')
// true
如果是有太多依赖的工程, 不建议将 [CHUNK].test 用方法的形式, 会有大量的日志吐出到命令行, 会崩溃的.
技巧
optimization.splitChunks.cacheGroups.[CHUNK].chunks 的参数
因为 VueCli 在一直升级, Webpack 也在升级, 所以打包体验越来越好, 针对老的项目优化比较费劲, 新的版本无需过多配制打包后反而很合理, 例如 echarts 导入地图的时候, 就自动就完成了切分, 但是在 VueCli3 中地图会被包含到 echarts 中, 所以打包参数还是需要合理调整的, 教程的建议中是都使用 all, 实际上在新版 VueCli4 中使用 initial 便会自动拆分地图, 而且更加合理, 所以要根据不同项目的工具依赖 包使用情况合理进行配置.